Design Decisions
Jupyter Notebook all the way down
Jupyter Notebook is used by many researcher relaying on open source software to create and document their work. Ipyannotator not only runs directly in Jupyter Notebook but is also developed as a collection of notebooks. This collection constitues a library, user documentation, and executable tutorials. This workflow is enabled by the innovative fastai library that turns Jupyter Notebook into a literate programming environment.
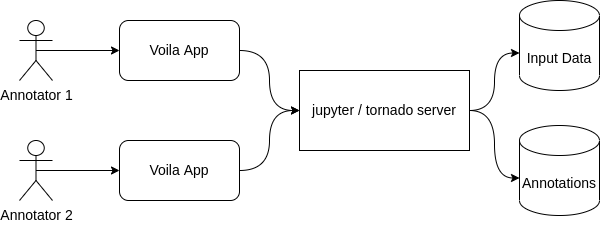
For the development of the user interface (UI) the Ipywidget library was used to build a graphical user interface (GUI) in Jupyter Notebook. Furthermore, the voila library, which uses Jupyter Notebook as a web-app, was also incorporated in the Ipyannotator project to create the GUI for an easy access to a web application.
Architecture
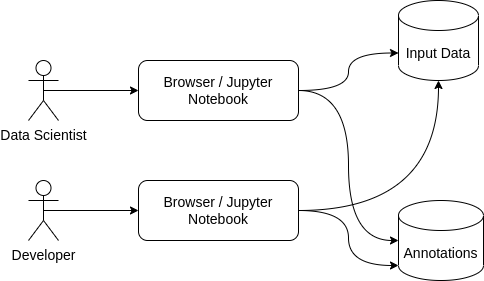
Ipyannotator’s architecture consists of three main systems components that comprise the user interface (UI), the server, and the data storage. These components are targeted at two different user types. A non-code architecture is included for non-technical annotators. The setup for a wide range of technically experienced annotators target users typically involved in research projects, e.g. data scientists, domain experts, and software developer.
For the technical user multiple tutorials are provided, demonstrating Ipyannotator’s utilization. The tutorials make it easier for new users get started and adapt the notebooks to their tasks. They also demonstrate annotation workflow and different features.
Layers
The layering design leads to loosely coupled systems, isolating responsibilities and allows to easier implement changes. Ipyannotator is separated into multiple layers to provide an architecture that allows the annotator to easier add extensions. The library uses four layers: view, controller, storage, and state. Each layer can be rewritten, extended and customized.
The View layer is responsible for rendering the visualizations. Ipyannotator uses ipycanvas and ipywidgets to structure and mount the visualization layer. Additionally, internal components such as the navigation menue were developed which helps the users to navigate through the images that need to be annotated.
The Storage layer is the layer that receives the data and stores it. Ipyannotator uses different types of storage formats like .txt and .SQLite.
The Controller layer acts as a mediator between state, storage and view. This layer tells when the information from the state will be stored.
Model/State (in memory) is the central function of the Ipyannotator layer structure. It is assigned to centralize the data and ensures the syncronization across the applications. If something changes in the Model/State layer, the information is passed on to other layers, ensuring synchronization of information.
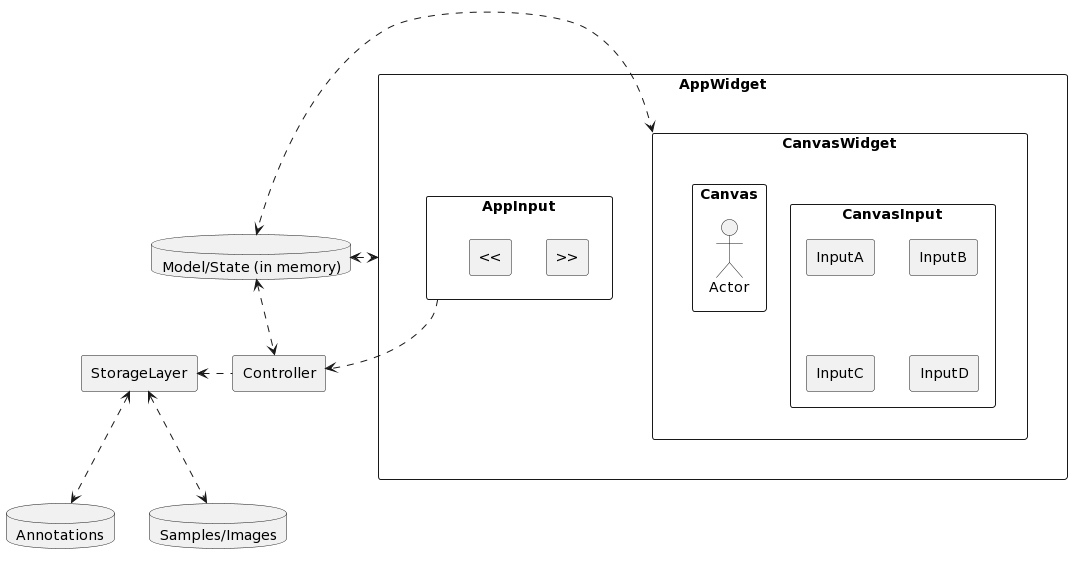
In the present state, Ipyannotator uses SQLite and JSON files as storage formats. Due to the project setup, the storage layer can be customized by other users to implement different storage formats.
The Ipyannotator comprises four annotation types: bounding box annotator, video annotator, capture annotator, and explore annotator. All types can be combined in the data analysis.
Bounding box annotator: Allow users to investigate and produce annotations on images, the annotations are limited to the bounding boxes format.
Video annotator: Designed to work with multiple frames of a video, this annotator allow users to inspect objects over the frames, visualizing the object’s trajectories and improving it. The annotations it’s also limited to the bounding box format.
Capture annotator: Enables users to navigate across a grid of images or labels and select multiple options. This annotator can be used in Ipyannotator’s improve step to check if image classification is correct, for example.
Explore annotator: Aims to be a quickly, easy configuration annotator, it can be used to navigate across images without worring about the Output in the Annotator API.
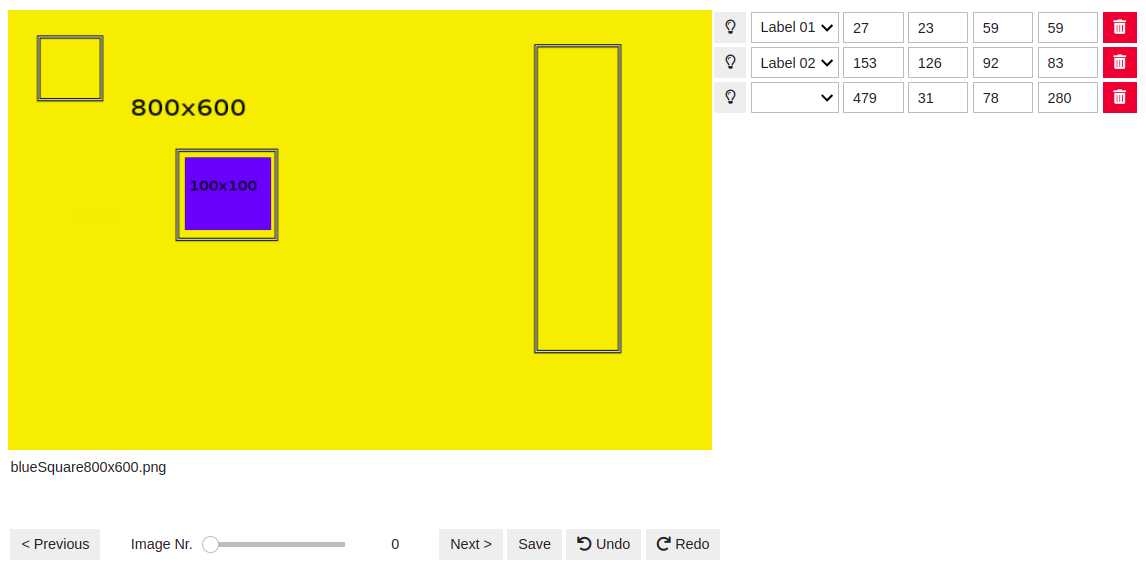
The bounding box annotator tool, displayed in the image above, contains three rectangluar annotations exemplifying how the user can draw on the canvas. The navigation menu at the bottom of the image allows users to explore all images. The navigation menu is common to all annotator tools. After an annotation is drawn, the tool allows the association with a semantic label located at the dropdown menue on the right. Additionally to the labeling, the annotator tool also permits to apply change to the coordinates of the drawing, enabling users to improve annotations.
It has to be emphasized that the entire interactive UI has been implemented using Python code only and without additional complex build steps. This allows every user with Python scripting experience to customize the annotation interface for domain specific requirements.